
Golden Oreo Dirt Pudding
This Golden Oreo Dirt Pudding is one of my favorite no-bake summer
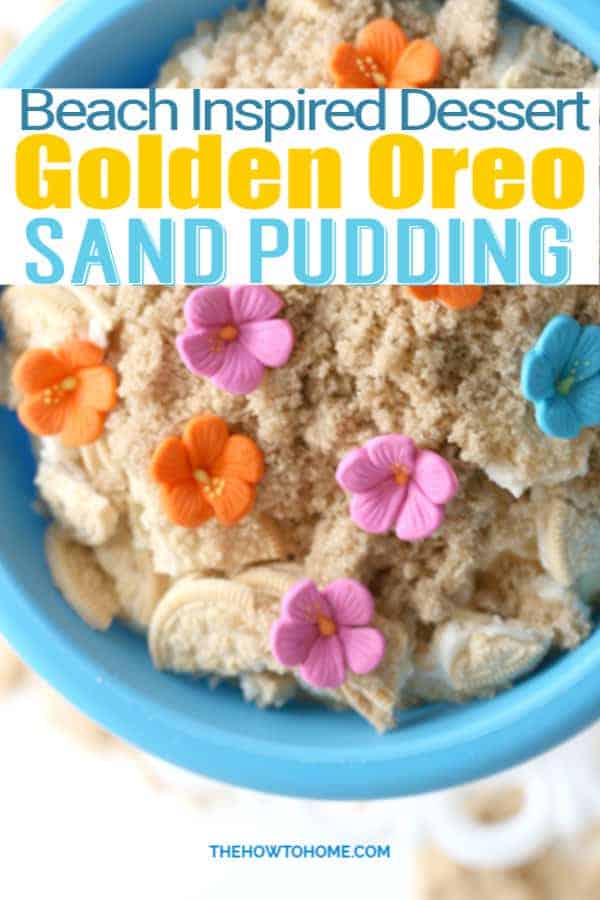
Think creamy vanilla pudding layered with crushed Golden Oreos and topped with a dusting of light brown sugar that looks just like real beach sand. It's cool, it's sweet, and it takes about 10 minutes of actual work. The hardest part is waiting for it to chill.
Whether you're calling it golden oreo dirt cake, golden oreo sand pudding, or just looking for a fun sand pudding recipe, this is the one people ask for every summer.
Why You'll Love This Recipe
- No
baking required - perfect for hot summer days when the oven is off limits. - It looks like a legit beach scene but uses simple, affordable grocery store ingredients.
- The whole thing costs around $6 to make and feeds 12 people.
- Kids go absolutely wild for the "sand" topping. Adults do too, honestly.

What Is Golden Oreo Dirt Pudding?
If you've ever had classic dirt pudding, the one with chocolate pudding and crushed Oreos that looks like a pot of dirt, this is the beach version.
Instead of chocolate, you use vanilla instant pudding. Instead of regular Oreos, you use Golden Oreos, which crush up into a pale, sandy crumble that actually looks like sand. The brown sugar on top seals the deal.
Served in a beach pail (yes, a real one from the Dollar Tree), it becomes a full conversation piece.
Ingredients You'll Need
Golden Oreos - about ⅔ of a standard package, crushed. These are the star of the show. The golden color and vanilla flavor mimic real sand perfectly.
Vanilla instant pudding - two 3.4 oz packages. Make sure you grab instant pudding, not cook-and-serve; they work very differently in no-bake recipes.
Cream cheese - softened to room temperature. This is what gives the filling that slightly tangy, cheesecake-like richness that makes it more than just pudding.
Cool Whip - folded in at the end to keep the filling light and fluffy.
Light brown sugar - for the "sand" garnish on top. Make sure it's fresh and loose, not clumped. If yours has hardened, here's the quickest way to soften brown sugar before you use it.
Powdered sugar and vanilla extract - mixed into the cream cheese base for sweetness and depth.

How to Make Golden Oreo Sand Pudding

This comes together in four simple steps:
Step 1: Make the pudding base. Whisk milk and vanilla pudding mix together for about 2 minutes until it starts to thicken. Set aside.
Step 2: Beat the cream cheese mixture. Mix softened cream cheese, vanilla extract, and powdered sugar in a stand mixer or with a hand mixer on medium-high until completely smooth. No lumps.
Step 3: Combine and fold. Add the pudding mixture to the cream cheese mixture and beat on low until well combined. Gently fold in the Cool Whip. You want it airy, not deflated.
Step 4: Layer and chill. Line your beach pail with plastic wrap. Add half the crushed Golden Oreos as the base layer. Pour in the pudding mixture. Top with the remaining Oreos, then dust generously with light brown sugar. Refrigerate for at least 1 hour before serving.
📖 Recipe
Golden Oreo Dirt Recipe
 Save Recipe

Equipment
- Beach Pail
Ingredients
- 24 Golden Oreos about ⅔ of a package, crushed
- 2 3.4 ounce packages of vanilla instant pudding
- 2 cups milk
- 8 ounces cream cheese softened
- 1 teaspoon vanilla extract
- 1 cup powdered sugar
- 8 ounces Cool Whip thawed
- 4 ounces light brown sugar for garnish
Instructions
- Whisk the milk and pudding mix together in a bowl until it starts to thicken, about 2 minutes, and set aside.
- Mix the cream cheese, vanilla, and powdered sugar together in the bowl of an electric mixer beating on medium high speed until the mixture is smooth and no lumps remain.
- Fold the pudding mixture into the cream mixture beating on low speed until well combined. Gently stir in whipped topping.
- Line beach pail with plastic wrap and add ½ of the crushed Oreos as a bottom layer.
- Add pudding mixture and then add the remaining half of the crushed Oreos to the top.
- Garnish with light brown sugar.
As with any of my recipes, calorie counts and nutritional information varies greatly depending on which products you choose to use when cooking this dish.
Nutrition
The Beach Pail Presentation
This is what takes it from "good dessert" to "everyone takes a photo of it."
I picked up a small blue beach pail at Dollar Tree, swapped the plastic handle for a piece of sisal rope, and lined it with plastic wrap before adding the pudding. Once it was chilled and topped with brown sugar "sand," I added a few seashells and a starfish around the base for the full effect.
If you don't want to use a pail, this works just as well in a trifle bowl, individual mason jars, or clear plastic cups, all great options for parties.
Tips for the Best Results
Use fresh brown sugar for the topping. If yours has been sitting in the pantry and hardened, it won't look like sand. Break it up or use a new bag.
Crush the Oreos fine. A food processor works great, or seal them in a zip bag and roll with a rolling pin. You want a sandy texture, not big chunks.
Chill long enough. One hour is the minimum. Two is better. Overnight is even better for a firmer, sliceable texture.
Make it ahead. This is a fantastic make-ahead dessert. Assemble the day before, refrigerate, and add the brown sugar topping right before serving so it doesn't get damp.
If you'd rather skip the Cool Whip, homemade whipped cream works beautifully here too - just whip 1 cup of heavy cream to stiff peaks.
Serving Ideas and Variations
Serve it with vanilla cupcakes decorated the same way - sprinkle brown sugar on top of white frosting and add an edible sugar flower for a full beach dessert spread.
To make it in individual cups: Use clear plastic cups so the layers are visible. Fill the bottom with crushed Oreos, add the pudding mixture, top with more Oreos and brown sugar. Stick a paper umbrella in each one for extra fun.
To make it nut-free or allergy-friendly: Double check your Oreo and pudding packaging since formulas change, but as written this recipe contains no nuts.
Add a garnish: Gummy fish or shark candies buried in the "sand" are a huge hit with kids.
Can I use regular Oreos instead of Golden Oreos?
You can, but you'll lose the sandy appearance. Regular Oreos will look more like the classic dirt pudding, which is still delicious but not the beach effect.
Can I make this in a 9x13 pan instead of a pail?
Absolutely. Layer it just the same in a 9x13 baking dish. It serves a crowd and is easy to scoop.
How long does golden Oreo dirt pudding last in the fridge?
Up to 3 days, covered. The Oreos will soften the longer it sits, which some people actually prefer.
What size beach pail do I need?
A standard small sand pail (the kind you find in the dollar section at Target or Dollar Tree) holds this recipe perfectly. It's about the size of a 1-quart container.
Is this considered a sand pudding recipe?
Yes, golden Oreo dirt pudding is essentially a sand pudding recipe. The crushed Golden Oreos mimic the look of real sand, making it a popular choice for beach parties and summer gatherings.
Did you make this Golden Oreo Dirt Pudding? Leave a star rating below! It helps more than you know! And save it to your Summer


Oh my word!!! Mary Beth that looks so amazing! I'm seriously in awe of how talented you are and this is just so fun! 🙂
Vanessa
You are too sweet and your comment means so much to me ~ thank you!!! 🙂
SO SO SO, PRETTY!!! The colors are simply amazing and beach sand has never looked so edible!!! LOL!!
You did a Fantastic job and thank you so much for sharing it with us!!
xoxo
Ohhhh ~ thank you, Angelina! I appreciate your kindness ~ hugs, mb
That looks delicious ... I'm grabbing my spoon right now! I love how fun this is ... the presentation is fabulous! Thank you for sharing!
Thanks so much, Becca ~ come on over ~ I have some left. 😉
This whole post is just pure eye candy lady!!!! So pretty. The dessert sounds delish and I look forward to sharing the cupcake recipe!!
Thanks so much, Shannon! 🙂
This is awesome! I love everything about even that you replaced the handle on the pail! SO cute! Great presentation! Would love for you to link up at Party In Polka Dots!
Shelley
Thanks so much, Shelley ~ I headed over and linked up ~ I appreciate the invite! Have a lovely week. mb
Wow, I'm really impressed Mary Beth! What a talent you have. The cupcakes are just gorgeous!
I can't tell you how much I appreciate your sweet words, Kristin ~ it really means a lot to me! Thank you. 🙂
Those are so adorable! I grew up near the ocean, and now live in a corn field. Hopefully this fall I will finally make it back to breathe in some salt air 🙂
I can't even imagine how wonderful it would be to live near the ocean! I hope you make it back this fall. Thanks for stopping by, Lisa.
It looks absolutely amazing Mary Beth! I love this and your pictures are gorgeous too!!
Your beach bucket cake is absolutely lovely, Mary Beth! I especially love the way you replaced the plastic handle with the sisal one!
Darn cute Mary Beth.
Bliss
Aw, shucks! Thanks so much, Miss Bliss! Have a wonderful day ~ hugs
This sounds really good, and it is super cute in the sand bucket!
Thanks, Jeni!
Okay...this is seriously so stinkin cute and yummy looking!! Gonna try it for my gang this weekend.
Thanks so much, Laura!
I love everything about this beachy post. Pinned. Thank you for sharing at the hop xo
Stunning photography girlfriend!! I'm simply amazed at the beautiful stylized photos you took - they really make me feel like I'm at the beach wiggling my toes in the sand! Yummy recipes too - what a fun way to celebrate summer!!
Thank you so much, Heather!
Mary Beth,
Oh WOW, so pretty and fun for all ages. I LOVE the pictures, they are all amazing. Don't you just love summer fun in the sun. See you tomorrow at Tuesday Trivia.
Hugs,
Wanda Ann @ Memories by the Mile
I do love summer fun in the sun, Wanda! Thanks so much for stopping by and I will definitely be over tomorrow for Tuesday Trivia. Hugs, Mary Beth
Absolutely adorable!!! I had made a sand pail cake about ten years ago for my daughter's beach party and she loved it (not to mention how easy it was to make too!). Love the beautiful photos you took too! (sharing 7 pinning like crazy). 😉
Beautiful!!
oh this would make even Martha Stewart smile! :>D
That is so sweet of you to say, Lisa ~ thank you!
I was so disappointed in the directions of this recipe. I read it 10 times. At no point does it tell you what to do with the pudding and the cream cheese mixture. Because of that, I made 2 separate layers.
Thank you so much for taking the time to leave this comment. You were absolutely right! The directions were missing a critical step and I have updated the recipe to reflect that. I hope you'll give it another try — it really is a delicious dessert when it all comes together the way it should!