
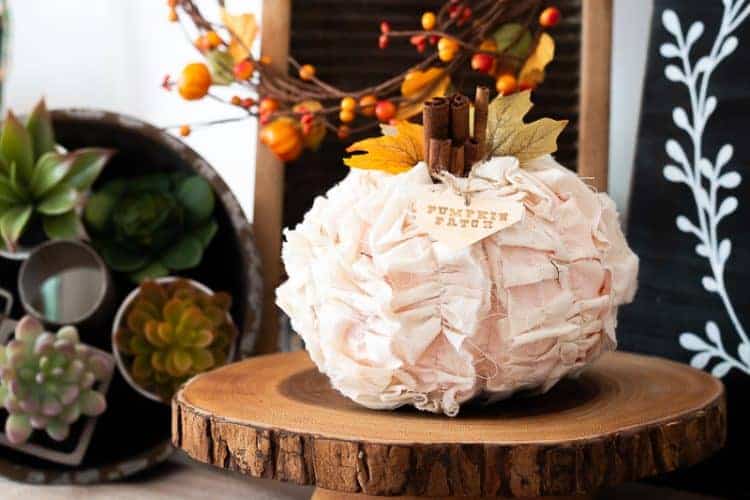
DIY Shabby Chic Fabric Pumpkin
The perfect shabby chic ruffled fabric pumpkin to craft for autumn using a pumpkin from the dollar tree
Pin it Now So You Have It for Later
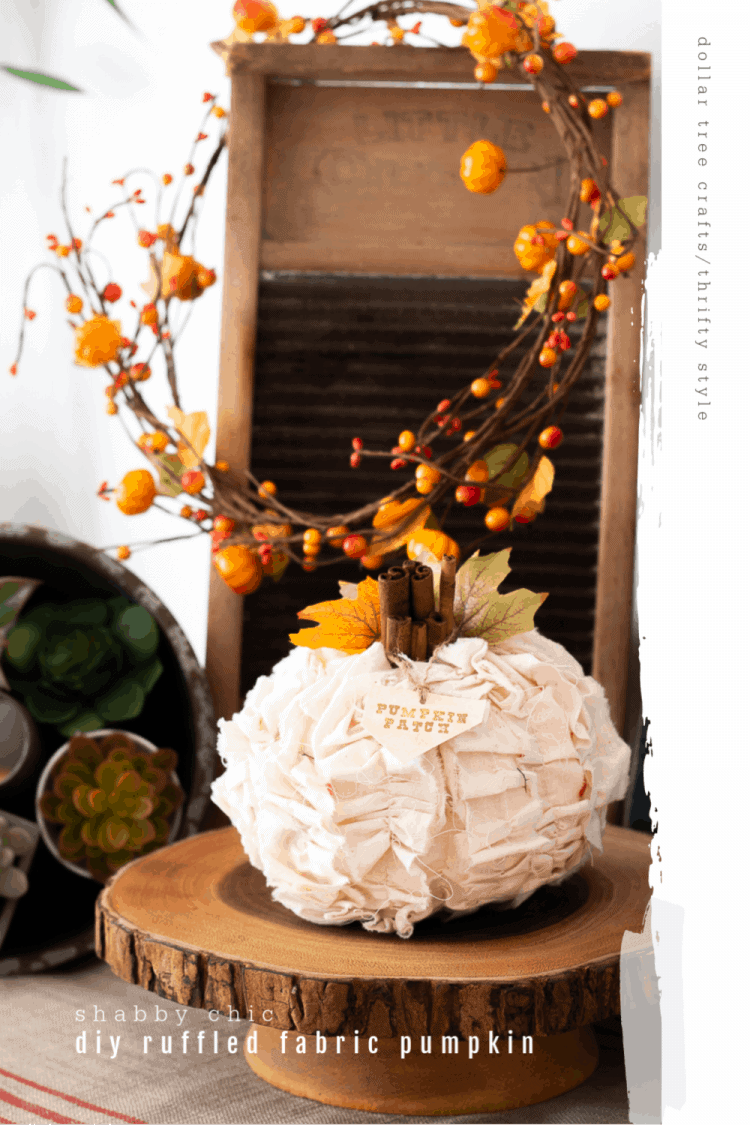
How to Make a DIY Shabby Chic Ruffled Fabric Pumpkin
Have you ever seen those orange styrofoam-ish pumpkins from the Dollar Tree and wondered what you could do with them?

I have and because they're cute and only $1.25, I would buy them and then sometimes, they literally just stayed in the bag or *sigh* I would just put them out as is. Ala carte. No DIY. Not even a bow stuck with a straight pin into the little green foam stem.
I know, that's sort of a DIY'er no-no but it was either during a time of depression, for real, when I only decorated because I didn't want my guys to think I didn't care or when I really had no idea what to do with them.
So, when I saw an idea and tutorial to make a ruffly fabric pumpkin YEARS ago, I knew I wanted to make one.
I love the Shabby Chic style but sometimes it's hard to add it to your autumn décor - until now! This DIY Shabby Chic Fabric Pumpkin is so easy to make and costs less than $2.00!
I bought almost everything I needed at the Dollar Tree with the exception of the fabric, but I have seen some somewhat flimsy dish towels there and I'm wondering if those would work.
What do you think?
Or, you could just go to the fabric store and buy some muslin. I think it's under $1.00 a yard...so, technically, it would also be a dollar-ish craft item.
I would love to say that this was my idea, but it wasn't. My inspiration came from 20 North Ora - I followed her directions almost to a T so please visit her site to see the original but below are the steps I took.
I'm not sure if they make smaller ones, but if they do, it would be cute to make a bunch of these and put them on a farmhouse fall tray like this one.
How To Make an Inexpensive Shabby Chic Pumpkin with Items from the Dollar Tree
DIY Shabby Chic Fabric Pumpkin

Equipment
- Sewing Machine - I have a very basic Brother sewing machine similar to this one and love it for basic sewing tasks.
Supplies
- Mini Styrofoam pumpkin from the dollar tree.
- Muslin fabric - ½ yard
- Thread the same color as the muslin fabric
- Hot Glue Gun
- Cinnamon Sticks
- White paint to cover the orange of the pumpkin
Instructions
- If desired, paint pumpkin first to cover the orange. I didn't and I debate whether or not I should have so this step is entirely up to you.
- Rip the muslin from edge to edge into 1 ½ inch strips. I made a small snip with sharp scissors 1 ½ inches apart the length of the muslin. Use the entire ½ yard of fabric for a nice fluffy pumpkin.
- Sew a long-running stitch, nice and loose, (nothing tight) down the center of each strip the entire length of the
strip. Now, gently pull one side of the thread only to create a ruffled effect as tight or loose as you would like. I chose to make mine over ruffly and therefore pulled the running stitch tightly. - Now start gluing the strips nice and tight next to each other from the top of the pumpkin down across the bottom and up to the other side.
- Add cinnamon sticks to the center for the stem and glue leaves around the stem. I added a hand-stamped tag just for a little something extra but that is totally optional.
As with any of my recipes, calorie counts and nutritional information varies greatly depending on which products you choose to use when cooking this dish.
More Pumpkin Crafts and Some Recipes:
I made this pumpkin years ago and still look forward to getting it out every year.
Do you have something that you can't wait to get out every year to decorate for fall?

If you make one of these, I would LOVE for you to share the pic with me - feel free to leave a comment below or send me an email at marybeth @ the how to home (dot) com


Love this! Absolutely adorable!
My husband hates my fake plastic pumpkins. He might approve of yours. It doesn't matter either way because I think they are adorable.
Just gorgeous!
Thank you, Katie!
Hi, Mary Beth! Thank you so much for linking your gorgeous shabby pumpkin up at the Primp Your Pumpkin Party! Just wanted to let you know that I featured you today! Hope you are having a wonderful week!
Jessica @ Mom 4 Real
Hi Mary Beth,
Just wanted to stop by and let you know you have been featured at One More Time,,,https://www.onemoretimeevents.com/2012/10/features.html Thank you for linkin up!
Tammy
I just love this shabby chic pumpkin. In fact, I, just like you, ADORE pumpkins. Winter, spring, summer and fall I will be decorating pumpkins. I'll be visiting your blog often!!
I have a special Halloween spotlight running today and I've featured your project.
Thank you so much for sharing your wonderful creation at homework.
This shabby chic pumpkin is adorable; it brings a new twist to Halloween! I love the shabby chic look and I am always looking for ideas on how to decorate and make accessories, thanks!
Mary Beth, This is absolutely adorable! I'm so glad I found it! ~Tammy~
This turned out ADORABLE! I love it.
Thanks so much, Gina!
I missed this last year! Wow, I love your muslin pumkin and your name, Shabby Chic Pumpkin, is perfect for it! I've pinned, not missing it this year!
Debbie 🙂
Thanks for the sweetness, Debbie! Have a great week.
Mary Beth
What a cute little pumpkin, I love it!