Polka Dot and Striped Halloween Mason Jars
Mason jars are probably the easiest base to use for crafting because they are so versatile and the beauty of them is, you can repurpose any jar you have.
This post contains some affiliate links for your convenience. Click here to read my full disclosure policy.
Polka Dot and Striped Halloween Mason Jars
If you know me you know I have a thing for polka dots. The dots and I are real tight.
I have polka dot pajama pants (and I shared a video on Instagram about getting caught in them by a neighbor), polka dot slippers, and I'm considering buying some polka dot shoes (these are just the cutest).
It's a bit of an obsession and I think I'll blame my mother for it - she was Polish and used to polka dance and since I'm not much of a dancer (hide the children if I ever dance in front of you-they'll have nightmares) I have subconsciously chosen the second best polka there is that being in the form of a dot.
That's my theory and I'm sticking to it.
Equipment
- Craft brushes and a stipler sponge plus hot glue if adding a small banner.
Supplies
- Mason Jars or repurposed jars - if you are repurposing jars you can find out here how to totally and easily remove the labels and the residue from them
- Frog tape for the stripes - the width will be determined by how wide you want your stripes to be. I chose a smaller width tape of .94 inches.
- Craft Paint - any type of inexpensive craft paint will do. I used Decoart for this project.
- Craft paintbrushes and a stipler sponge.
- Optional: Googly-eyed spider tealights, and small Halloween Banner
Instructions
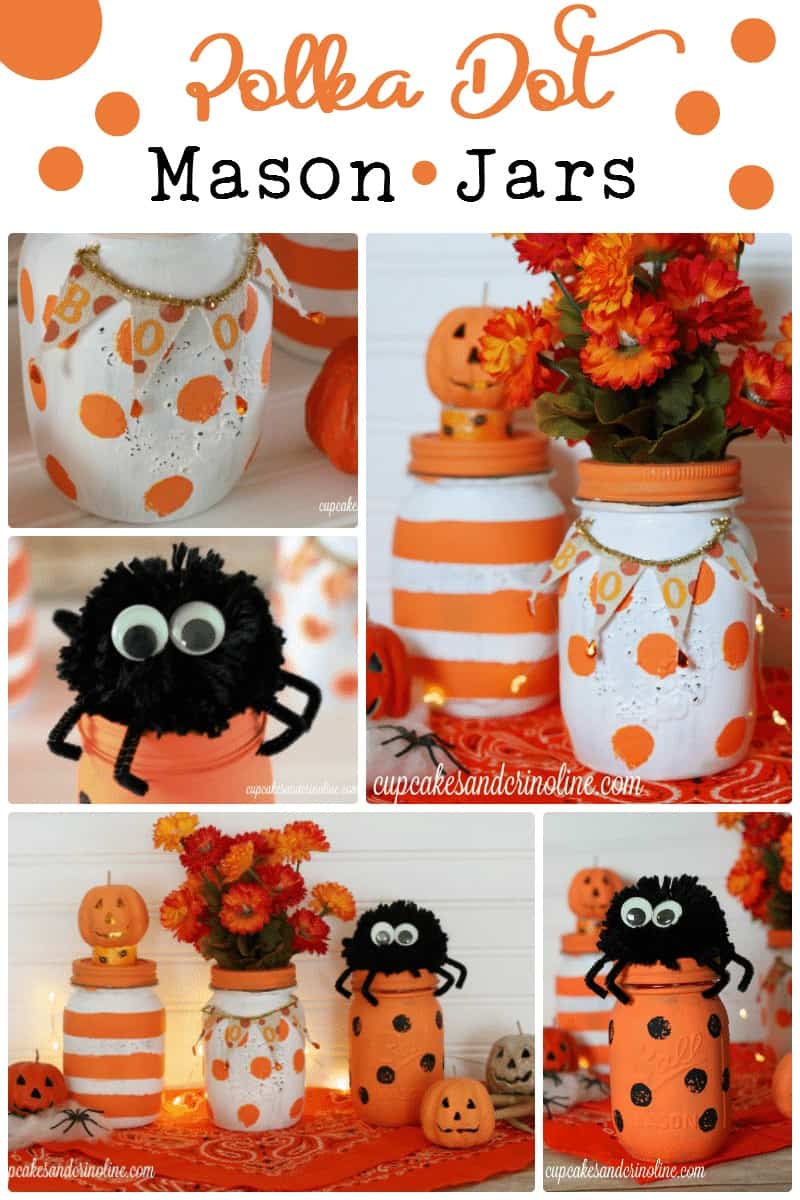
- For the striped jar I used Frog Tape in a smaller width to mark where
I wanted the lines but I didn't snug it up tight enough (I didn't want to pull
the white paint below off) and I had some leakage but it's not too noticeable
especially if I turn the jar just right. - I had a lot of fun decorating the Mason Jars. I used a BOO banner from
the scrapbooking department of a local craft store for the vase jar and
placed an inexpensive bunch of faux flowers inside. - For the striped mason jar, I wrapped a battery-operated tea light with washi tape and placed a painted papier-mache pumpkin on the top. I carved out the bottom of the pumpkin using an X-Acto knife to allow for the candlelight to show through.
- I also had some fun making a pompom spider with a 4.8 cm pompom maker maker and adding black chenille stems for the legs. I also glued some glow-in-the-dark googly eyes onto his little head and placed him atop the orange mason jar with black polka dots.
As with any of my recipes, calorie counts and nutritional information varies greatly depending on which products you choose to use when cooking this dish.
Supplies:
Mason Jars or repurposed jars - if you are repurposing jars you can find out here how to totally and easily remove the labels and the residue from them
Frog Tape for the stripes
Craft Paint
Optional: Googly-eyed spider, tealights, and small Halloween Banner
Craft paintbrushes and a stipler sponge similar to the one in the pic above
I made these mason jars the same way I painted my crazy spring polka dot jars (you can find the full tutorial here).
For the striped jar I used Frog Tape in a smaller width to mark where I wanted the lines but I didn't snug it up tight enough (I didn't want to pull the white paint below off) and I had some leakage but it's not too noticeable especially if I turn the jar just right.
I had a lot of fun decorating the Mason Jars. I used a BOO banner from the scrapbooking department for the vase jar and placed an inexpensive bunch of faux flowers inside.
For the striped mason jar, I wrapped a battery-operated tea light with washi tape
and placed a painted papier-mache pumpkin
on the top.
I carved out the bottom of the pumpkin to allow for the candlelight to show through.
I also had some fun making a pompom spider, gluing some glow-in-the-dark googly eyes
onto his little head and placed him atop the orange mason jar with black polka dots.
If you like googly-eyed critters I have a tutorial and video here for BIG glittery spiders made with items from the Dollar Tree- cute, cheap, and scary!
My youngest son had some fun placing a papier mache pumpkin on top of the spider....
I love his totally adorable look that says, "what's happening!?!". He looks so cute!
And there you have it - a set of DIY Polka Dot and Striped Halloween Mason Jars.
If something a bit more blingy is your style, I also have a tutorial on a gold gilded mason jar that you can see here.


I too love polka dots.. these came out so cute and cutting out the bottom and adding a tea light is just perfect!
Thanks so much, Tammy!
super cute Mary Beth!
Thank you, Susan!
Oh my gosh, so so so cute. I am loving all the jars and the pom pom spider too!
Thank you, Malia! The spider is my favorite - he's staring at me right now. 😉
Love this! What a gorgeous display for a sofa table or a mantel. My mom is Polish too! I'm not much of a dancer either I'd much rather a polka dot too 😉
Thank you, Michelle! Yay to Polish moms 🙂
Mary Beth... your vignette just exudes happiness!! Seriously... I've got a grin on my face. 🙂 Pinning so I can "do" these, too!! [hugs]
I love your polka dot theory, makes perfect sense. These jars are too cute, I like adding fun and not so spooky stuff to my Halloween decot.
Thanks so much, Sarah! I think my polka dot theory is a game changer 😉
These are adorable, Mary Beth! I love them all!
Thank you so much, Steph!