
How To DIY an Outdoor Hanging Planter

There's something so exciting about DIY projects especially for your outdoor space and that's why I enjoy adding my own DIY outdoor hanging planters around my yard. From deciding between full sun or partial shade and the perfect small plant for each large planter, every step can bring you closer to crafting something absolutely perfect for your home.
And the best part? I realized this was a great way to sprinkle a pop of color across my outdoor living space and to also hang my favorite plants at eye level, making every glance outside my windows a happy treat.
Jump to:
*This post may contain affiliate links and I'll earn a commission if you shop through them. You can read my full disclosure here.
Benefits of DIY Outdoor Planters
A project like this brings a sense of satisfaction that's hard to get with store-bought alternatives. I have discovered that putting my green thumb to use, especially in creating custom solutions for my living space, offers a unique blend of personalization and creativity. This approach allows me to tailor each planter to fit the specific needs and aesthetics of my outdoor areas. The joy of watching my favorite plants thrive and hang beautifully on my front porch and other outside areas, especially if you have a pergola on a deck, adds a pop of color and a touch of greenery that breathes new life into my home. Indeed, the journey from assembling simple materials to enjoying the lush, eye-catching displays of fresh plants is a great way to connect with nature and unleash your creativity!
Choosing the Right Materials
While your imagination is truly the only limit to what you can create, I'm including a step-by-step tutorial for making Hanging Gutter Planters that allow you to add a vertical garden element with ease.
Supplies
- 10 ft. traditional gutter - I used a metal gutter as locally vinyl isn't available so don't be discouraged and think you can't make this if you can't find the vinyl ones - update: (the vinyl ones are currently available and here is a link to the ones I found)
- 3 Sets - White Gutter End Caps - 3 left and 3 right
- White gutter screws - 18 (the package I purchased contained 25)
- 20´- 1⁄4 in x 1ft. white braided nylon and polyester rope cut at the store (or purchased using the provided link)
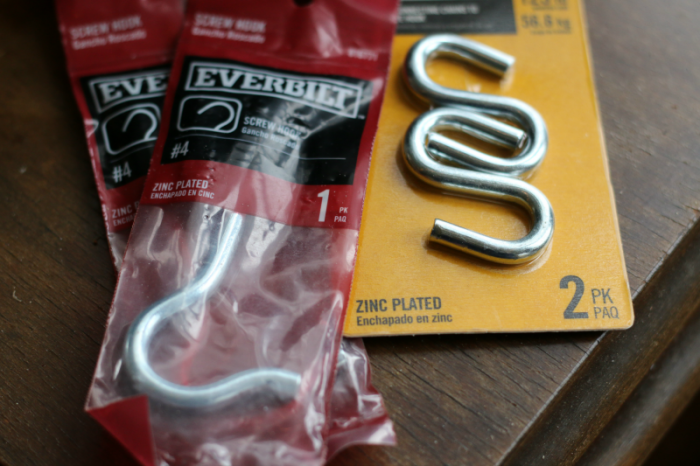
- 2 - 3 in. Steel Screw-In Plant Hooks
Tools:
How to Make a Rain Gutter Planter
I purchased One 10-foot gutter and an associate at the hardware store cut it into 4 equal 30 inch sections. Be careful when handling this - the metal edges can be sharp. After giving it some thought I decided to work in odd numbers using only 3 gutters for my finished project which left me with one lone gutter to fill and use elsewhere in my garden.
*If you would like to add even more color to your space go ahead and spray paint the planters after the drilling is done.
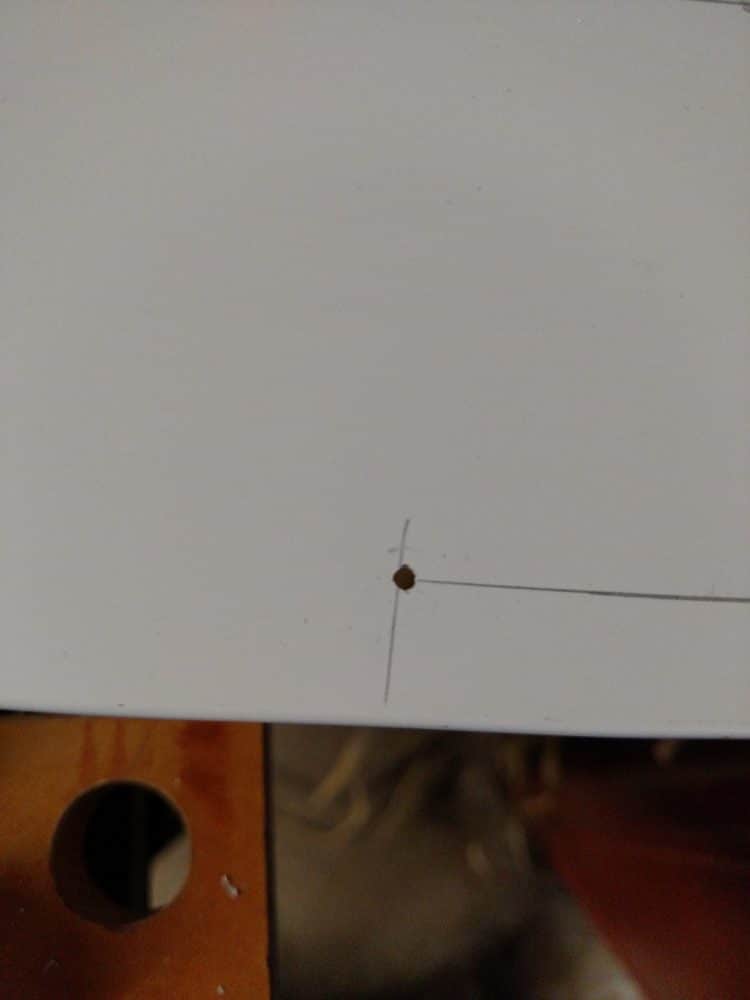
The first thing I did was to measure for gutter holes - turn your gutters upside down and mark 3" in from the short side and ½" in from the long side.
Now flip your gutters right side up and mark 3" in from the short side and ½" in from the long side on all 4 corners and once again, make a mark.
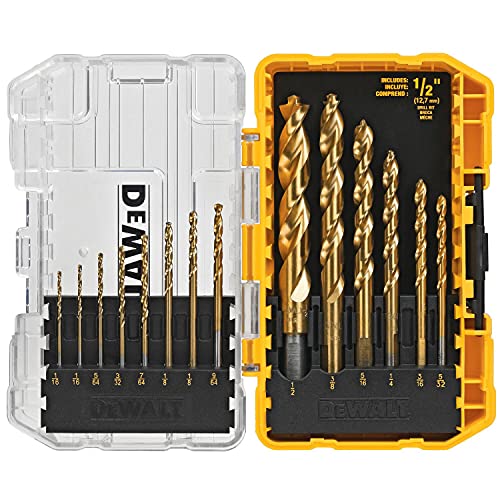
Do this on all 3 gutters, both right and left sides. Drill holes at each mark - I used the ⅛" drill bit to do pilot holes first since I was using a metal gutter and then used those holes as a guide for drilling with my ⅜" drill bit. You will have 8 holes on each gutter.
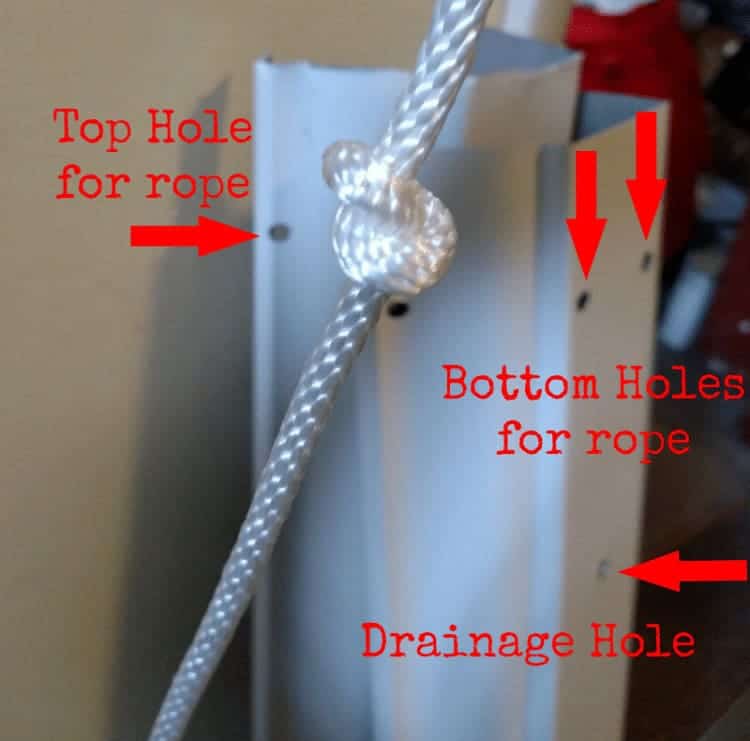
I also drilled two ⅜" inch drainage holes on the bottom of the planter gutter and four ⅛" holes for drainage as well.
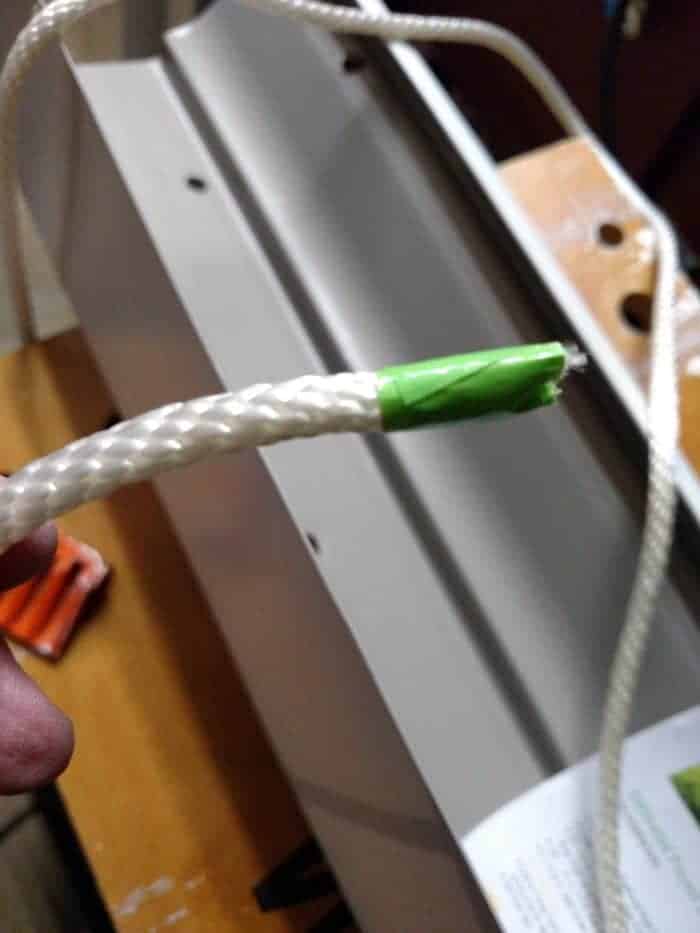
Next, cut a generous section of loose cord. For this DIY project I cut the rope in half into two 10' lengths.
Tie simple knots at the end of each rope piece.
Thread the unknotted end of the loose cord (rope) through one of the holes in the bottom of the left gutter section and then out the hole in the side.
You can put a piece of tape on the end to make the threading easier. Repeat the threading up and through the bottom hole and through the side hole on the next two gutter sections.
Measure 12" of slack and tie a knot between the second and third sections. You will have a knot underneath each gutter on each side.
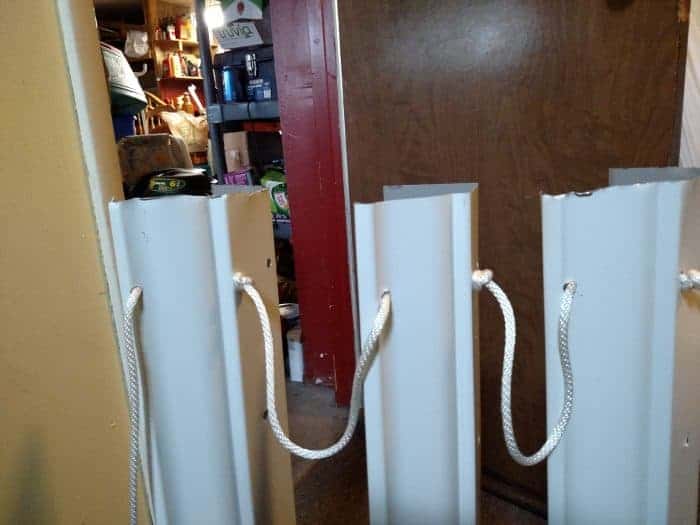
Once all three gutter sections have been threaded loop the top and thread it back down the inside hole of the left gutter.
Once the rope has been threaded down through the last remaining bottom hole of the third gutter section make a know (again, this is underneath the gutter).
I left any excess in place to allow for adjusting once hung. Repeat the above steps for the right side.
Place the end caps on each side of your gutters. I added gutter screws to each end cap since I was using a metal gutter.
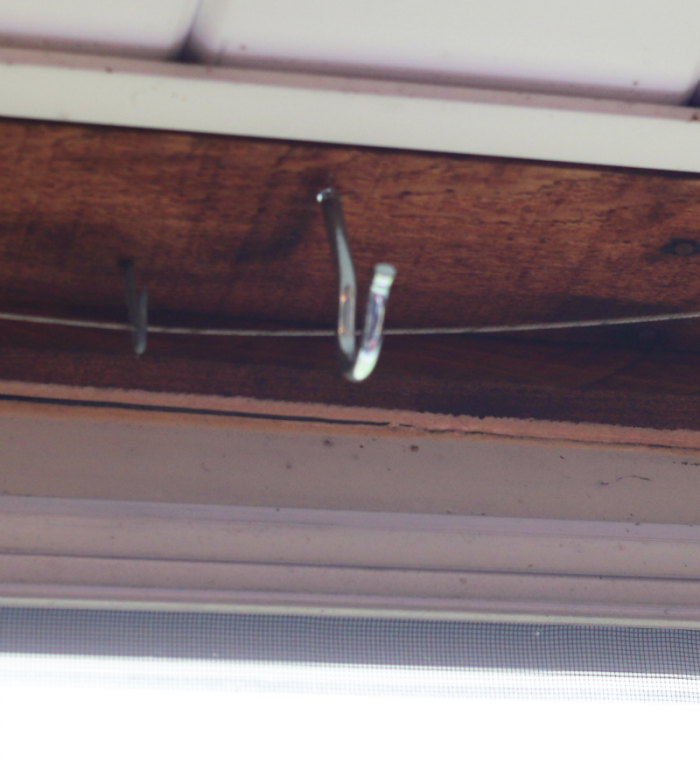
Secure plant screw hooks into a beam or a strong support. Loop the two S-hooks on each side of the top ropes and hang your gutter planters.

Once hanging, you may need to loosen and adjust the simple knots between each planter section. Mine were fairly even but I did have to do some adjusting. Note that you'll want to do the adjusting BEFORE you add dirt and plants to your planters. It's just easier that way!
When everything is adjust, cut off any excess cord.
What Plants Can I Grow in Vertical Planters?

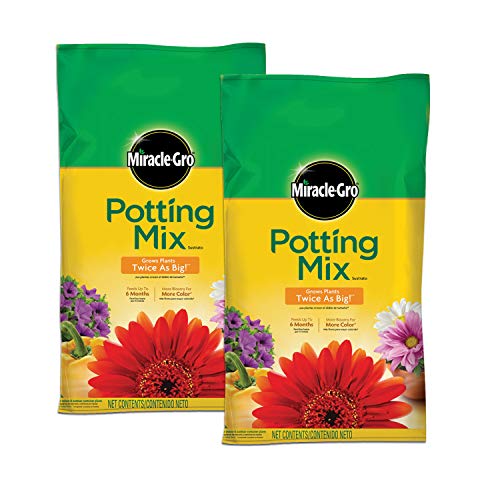
Add a good quality potting mix and fill your planters with whatever your heart desires! Plants like string of pearls love basking in full sun, while blue lobelia flourishes in partial shade.

Herbs are another great alternative and would be perfect for an outdoor kitchen herb garden.

Keep in mind that if a plant doesn't work out you can gently remove it from the planter and replace it with a new one!

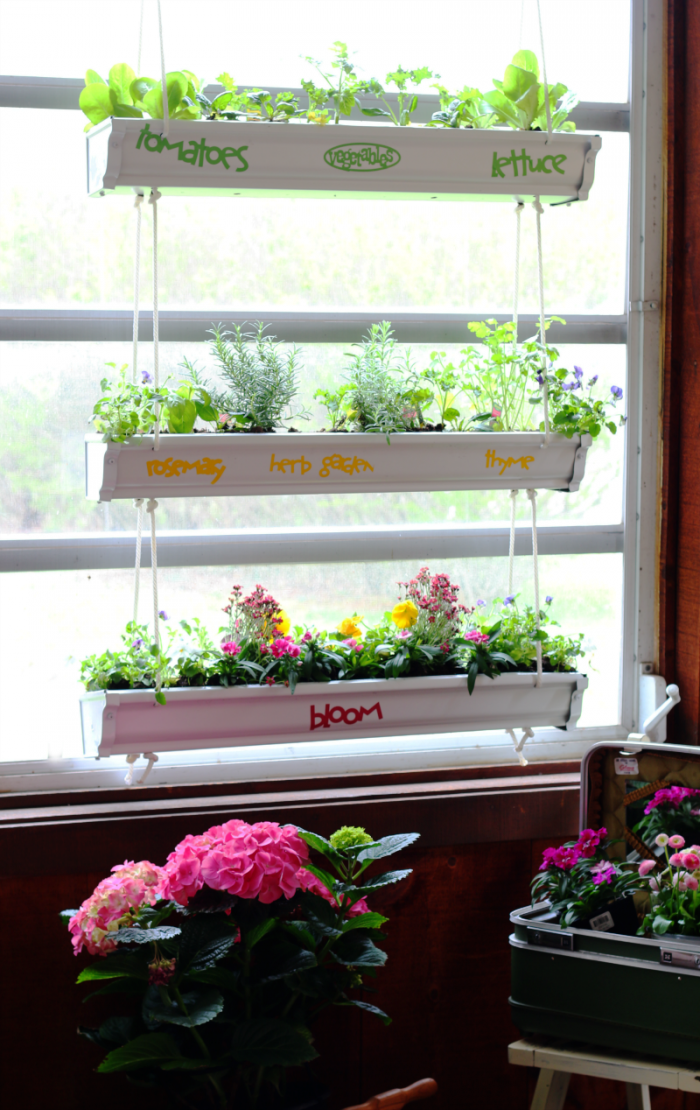
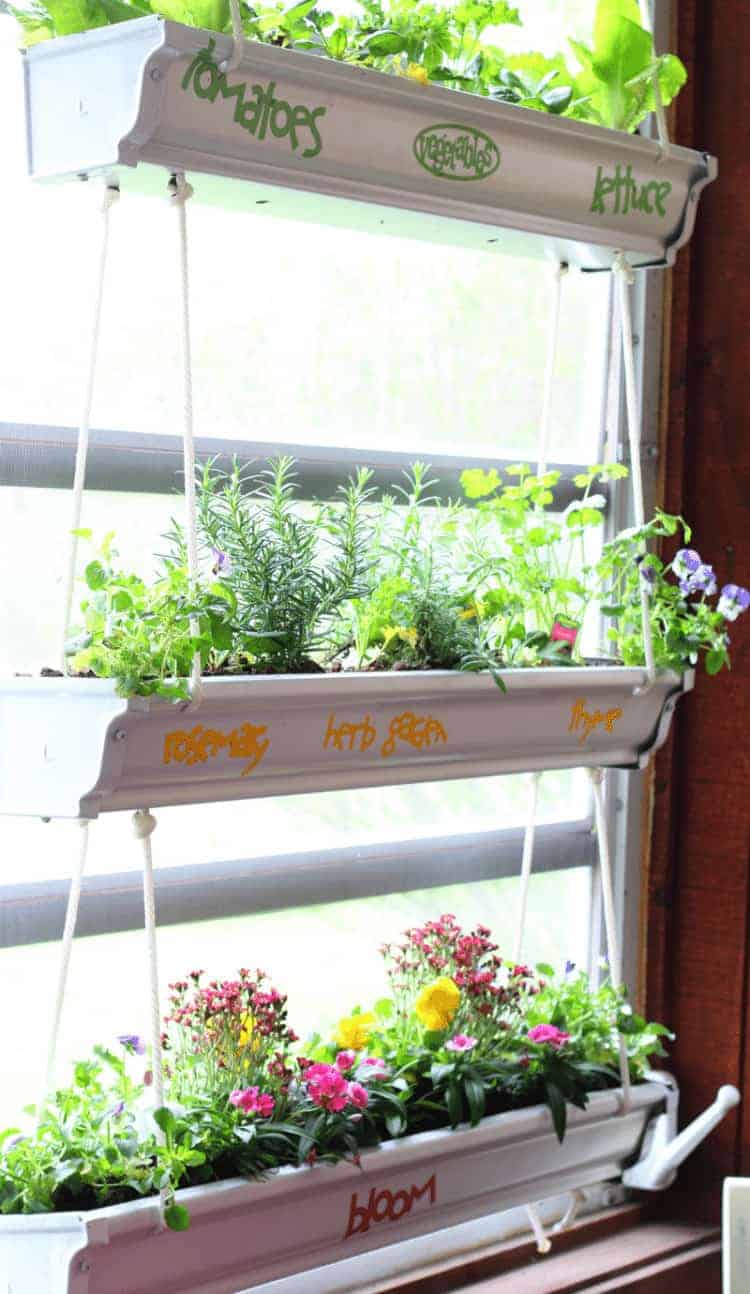
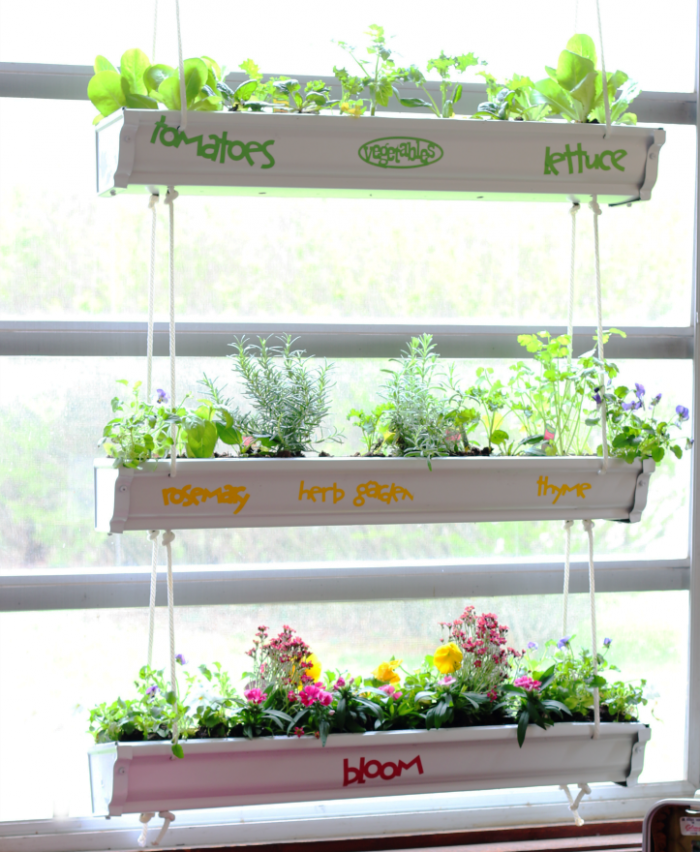
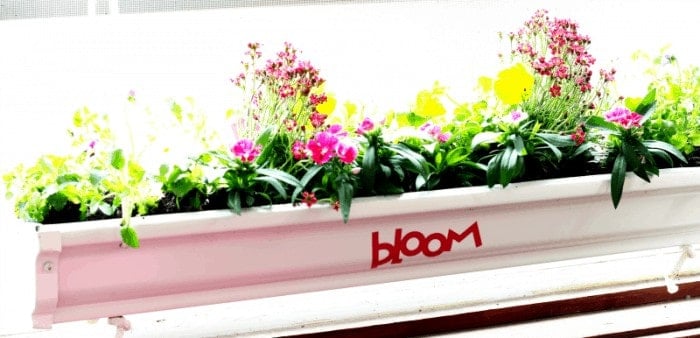
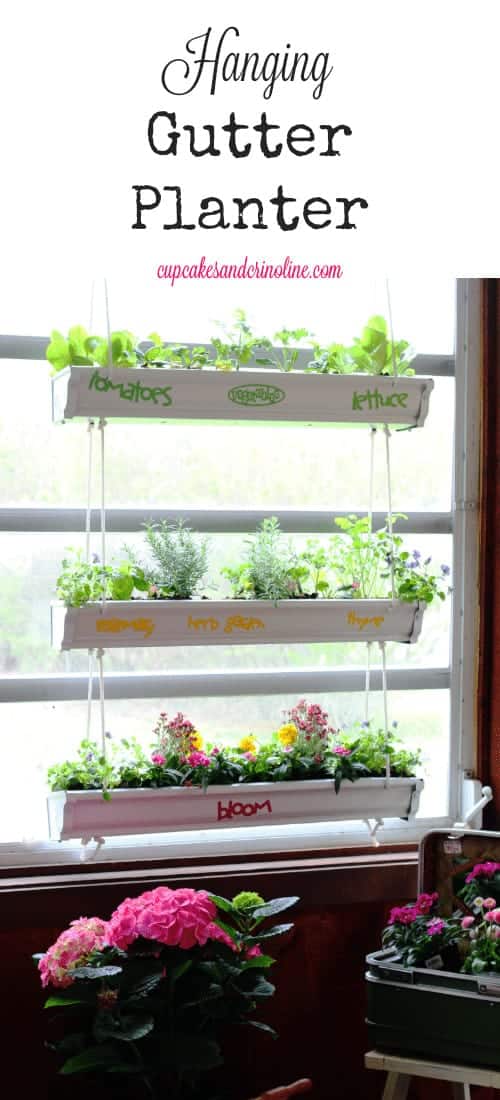
I customized mine by adding vinyl cutouts for each gutter level (I used my Cricut to make these - all of the SVG files can be found for free in Cricut Access).

I wanted one gutter for vegetables, one for herbs and one for flowers.
I added flowers to the center level as well- you can never have too many flowers.
Keep in mind when filling your planter that there will not be a lot of room for growth or spread so smaller flowers and herbs will work better.
I haven't done it yet but I think that a succulent garden, something like the hens and chicks in this post, would work great in the gutters.
I have mine hanging in my sunroom for now but will move it outside once there is no more danger of frost in my area.


DIY Outdoor Hanging Planter

Equipment
- Gutter
- Gutter Screws
- Drill
- Gutter End Caps
- Drill Bits
- Rope
- Plant Hooks
Supplies
Supplies
- 10 ft. traditional gutter - I used a metal gutter as locally vinyl isn't available so don't be discouraged and think you can't make this if you can't find the vinyl ones - update: the vinyl ones are currently available and here is a link to the ones I found
- 3 Sets - White Gutter End Caps - 3 left and 3 right
- White gutter screws - 18 the package I purchased contained 25
- 20 ´- ¼ in x 1ft. white braided nylon and polyester rope cut at the store or purchased using the provided link
- 2 - 3 in. Steel Screw-In Plant Hooks
Instructions
- I purchased One 10-foot gutter and an associate at the hardware store cut it into 4 equal 30 inch sections. Be careful when handling this - the metal edges can be sharp.
- Measure for gutter holes - turn your gutters upside down and mark 3" in from the short side and ½" in from the long side.
- Now flip your gutters right side up and mark 3" in from the short side and ½" in from the long side on all 4 corners and once again, make a mark.
- Do this on all 3 gutters, both right and left sides. Drill holes at each mark - I used the ⅛" drill bit to do pilot holes first since I was using a metal gutter and then used those holes as a guide for drilling with my ⅜" drill bit. You will have 8 holes on each gutter.
- I also drilled two ⅜" inch drainage holes on the bottom of each gutter and four ⅛" holes for drainage as well.
- Next, cut your rope in half into two 10' lengths.
- Tie a knot at one end of each rope piece.
- Thread the unknotted end of the loose cord (rope) through one of the holes in the bottom of the left gutter section and then out the hole in the side.
- You can put a piece of tape on the end to make the threading easier. Repeat the threading up and through the bottom hole and through the side hole on the next two gutter sections.
- Measure 12" of slack and tie a knot between the second and third sections. You will have a knot underneath each gutter on each side.
- Once all three gutter sections have been threaded loop the top and thread it back down the inside hole of the left gutter.
- Once the rope has been threaded down through the last remaining bottom hole of the third gutter section make a know (again, this is underneath the gutter).
- I left any excess in place to allow for adjusting once hung. Repeat the above steps for the right side.
- Place the end caps on each side of your gutters. I added gutter screws to each end cap since I was using a metal gutter.
- Secure plant screw hooks into a beam or a strong support. Loop the two S-hooks on each side of the top ropes and hang your gutter planters.
- Once hanging, you may need to loosen and adjust the simple knots between each gutter section. Mine were fairly even but I did have to do some adjusting.
- Once everything is adjusted, cut off any excess cord.
- What Plants Can I Grow in Vertical Planters?
-
- Add a good quality potting mix and fill your planters with whatever your heart desires! Plants like string of pearls love basking in full sun, while blue lobelia flourishes in partial shade.
-
- Herbs are another great alternative and would be perfect for an outdoor kitchen garden.
-
- Keep in mind that if a plant doesn't work out you can gently remove it from the planter and replace it with a new one!
- I customized mine by adding vinyl cutouts for each gutter level (I used my Cricut to make these - all of the SVG files can be found for free in Cricut Access).
- I wanted one gutter for vegetables, one for herbs and one for flowers.
- I added flowers to the center level as well- you can never have too many flowers.
- Keep in mind when filling your planter that there will not be a lot of room for growth or spread so smaller flowers and herbs will work bett
As with any of my recipes, calorie counts and nutritional information varies greatly depending on which products you choose to use when cooking this dish.
Decorating and Personalizing
If you don't have access to an outdoor space the perfect solution would be to keep this inside and add a touch of greenery with house plants or even faux plants to your indoor living space.
You could add some wooden beads to the rope at different levels for some visual interest.
I hope this inspired you to create some eye-catching displays that will breathe new life into your home and yard.
Here are some more cool hanging planters to inspire you:

DIY Chandelier Garden Planter With Dollar Store Solar Lights from Our Crafty Mom

DIY Hanging Grapevine Basket Planter from Artsy Pretty Plants

DIY Flower Planter Box from Amy Oliver

DIY Hanging Plant Holder from Homespun Seasonal Living

DIY Leather Plant Hanger from Me
Check out all of these other awesome customized Hanging Gutter Planter Blog Posts (by some of my very favorite bloggers) to get some inspiration!
The Creative Mom | Her Toolbelt | The Contractor Chronicles | A Girl and a Glue Gun | Make It Love It
Live Laugh Rowe | My Fabuless Life | Place of my Taste | Hawthorne and Main | House By Hoff
Domestically Speaking | My Repurposed Life | Designs By Studio C | Cupcakes and Crinoline
All Things Thrifty | Lou Lou Girls | Reality Daydream | Over The Big Moon | Pretty Providence


This is awesome. I love the fact that you are growing, veg, herbs and flowers in it as well. I think I might have to make one myself.
Thank you so much, Claire!
I love how the plants are labeled on the gutters - so adorable!
Thank you, Cher!
Love this fun planter idea!!! These Home Depot Workshops are such a clever way to spend time with your friends and make something for your home too!
Thank you, Heather! If we lived closer we could go to one together. xo
That is SO fun! I never would have thought of that . . . I gotta try this!
Thank you, Amy!